

Most of my fire hose projects so far have been cutting crafts using the inherent properties of the material to create new things. The constructive projects have been clunky, using nuts and bolts like many of us do to wrestle together stiff pieces of hose like your uncle trying to hold down your rowdy cousins at the table during Thanksgiving. It would really be great to have a way of fabricating with a little more refinement and detail.
There's a lot of product out there for the well-heeled hipster to surround themselves with recycled fire hose home goods, be it Oxgut Hose Co, Recycled Firefighter, or the grand daddy Feuer Wear. But who among us has the time and money to spend on learning to use and maintain an industrial sewing machine, let alone $469 to spend on a hose ottoman that looks like the city-slicker cousin of our zoo-made hose cube balls?

Image: Oxgut Hose Co
For about $10 at Amazon you can get a Speedy Stitcher sewing awl that gives you all that finger-maiming power in a handheld package. It's not the best design, like for the life of me I'll never figure out how to reload the spool so it self feeds again, but it's cheap! Cheaper than the Tandy Leather version which does look like the average non-robot could reload it, but twice as expensive. And it looks a little flimsier in the needle support. There's always a downside.
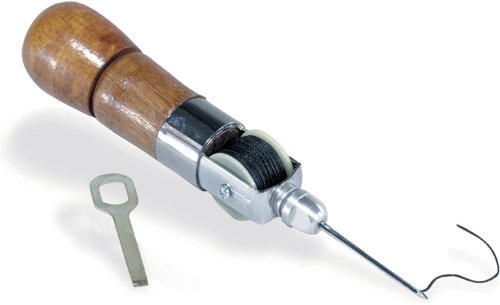
Image: Amazon
Whatever the version you're getting a handheld sewing machine and you are the motor. For the Speedy Stitcher you get a box, directions, and this:

Unscrew the chuck lock (the big knurled metal knob) and you find the needle storage and working end of the thread. I'm using the straight needle so I inserted that into the chuck making sure to line up the long groove in the needle with the line of thread on the handle.


Then I could thread the needle and replace the chuck lock. This is why it was important to line up the groove on the needle, so that thread could continue feed from the handle through the chuck lock as you go.


Let's talk about that thread. It's waxed nylon so it's tough yet easy to get through thick material and because it's plastic it melts and we'll use that property to finish our projects tidily. But look at how beautifully that bobbin is wound. I have never had the patience to do it right and so mine never feeds properly. Also pay attention to the direction the thread is wound tension post because that will also cause feed problems, even with perfect bobbin.


Enough with introductions, let's sew something! We're going to make a little fire hose toy that's light and chewable because it's not closed up with 4 pounds of metal or ugly zip ties.
Take a just-barely-longer-than-square piece of hose of any width with rubber in it. I went small so there's less to sew for the tutorial.

My pictures are for demonstration so don't think you should sew unsupported. Work on a flat surface and use a larger piece of hose as backing so you don't dull the tip of the needle.
Now stab it! And go all the way through, all the way to the hilt. But not your hand.


Then pull the free end of the thread all the way though. Have enough free thread to cover the distance you plan on sewing plus some extra inches for knotting at the end. Pull the needle out making sure the thread stays on the other side.


Remember the feeding groove of the needle from earlier? I like to have that facing away from the short end of what I'm sewing to make the next part easier.
Move along the seam you intend to sew and insert the needle all the way in again. Now pull back only slightly and you'll see the thread bunch up a bit by the tip. That's because the hose is squeezing the needle and thread tightly so as you pull the needle out the thread gets stuck. Insert the free end of thread through that little loop, pull tight, and back the needle all the way out. Congratulations, you have made your first


Continue the process until you get to the end of the seam. After you push the needle through the last time, pull some extra thread through to make the loop larger and cut it off toward the needle tip. This is so you have enough to make a knot with the leftover bit of the free end of the thread.


Tie a square knot and trim the ends leaving about a 1/4 to 1/2 an inch. Take a lighter and slowly approach the ends to melt the nylon into knobs that will prevent the knot from coming undone.


So that's the easy part. The real trick comes next. Fold the other end of the hose in half against its natural crease so that what were once the corners are now in the middle. Then sew this new seam like before.

The first few stiches may be difficult to get started, but once you do the thread will keep the edges together. You'll end up with a neat tetrahedral shape that is squishy and rolls haphazardly. That may be kind of fun by itself but the good stuff starts when you cut a hole in the side.


Think of it as less phallic Amazing Graze. You know what I'm talking about.
Some last tips I've learned for your first sewing projects. Using a larger piece of hose as a backing not only keeps the needle tip sharper, but because you can also you have neat and straight lines on both sides of your project because you can ensure you're going straight up and down.

And remember since you are the sewing machine you not only have to be the motor but act as the feet to keep proper tension on your stitches. I like to pull the thread on both sides of the seam to make sure that lock stitch stays between the two layers of hose. The first picture shows the thread on the visible side has pulled the thread from the other side through. In the second I corrected this by pulling on the free end of the thread on the underside.


No comments:
Post a Comment